


Installing new baseboards is an essential step in finishing a room, providing a clean and polished look that covers the joint between the wall and the floor. A well-installed base board can significantly enhance the aesthetic appeal of a space, adding a touch of sophistication and completeness. But, how to cut baseboard corners without miter saw is the biggest question we get.
Typically, a miter saw is the go-to tool for cutting baseboard miter joint corners with precision, but not everyone has access to one. You might be working in a small space where setting up a large power tool isn’t practical, or perhaps you’re just starting out with DIY projects and haven’t yet invested in a miter saw.
The good news is that you don’t need to own expensive equipment to achieve professional-looking results. With the right hand tools and techniques, you can cut baseboard miter angle corners just as effectively.
Whether you’re a seasoned DIY enthusiast or simply looking to save money on tools, this guide will walk you through the process of cutting baseboard corners without a miter saw. By following these simple steps, you can ensure that your baseboards fit perfectly in every corner, giving your room a polished and finished appearance.
If you’re tackling more woodworking and home improvement projects, be sure to check out some of our other DIY guides. Learn how to choose the Best Sander for Removing Paint from Wood before refinishing trim or furniture, understand the difference between a Counterbore vs Countersink for cleaner fastener installation, and discover the Best Screws for Plywood when building shelves, cabinets, or custom projects. If you’re planning a furniture build, our guide to the Best Wood for DIY Furniture can help you choose the right materials, while our tutorial on How to Cut Thick Wood with a Circular Saw covers another useful skill every DIYer should know.
Can You Install Baseboards Without a Miter Saw?
Yes, you can absolutely install baseboards without a miter saw. Many DIYers successfully use a miter box, coping saw, hand saw, or circular saw to make the necessary cuts.
While a miter saw makes the process faster and easier, it is not required. With careful measuring and accurate cuts, you can achieve professional-looking results using more affordable tools.
What Tools Can You Use Instead of a Miter Saw?
While a miter saw is one of the easiest tools for cutting baseboards, it’s not the only option. If you’re tackling a DIY trim project and don’t own a miter saw, there are several alternatives that can help you achieve clean, professional-looking cuts.
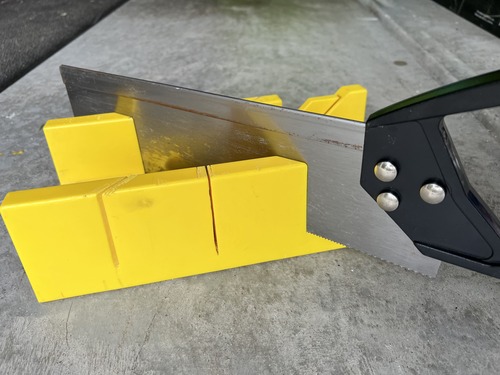
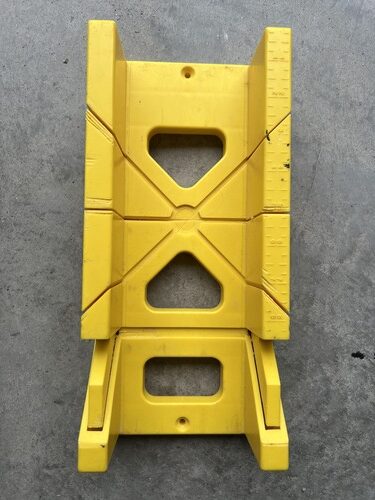
Miter Box and Hand Saw
A miter box is one of the most affordable alternatives to a miter saw. It features pre-cut angle guides that help you make accurate 45-degree and 90-degree cuts using a standard hand saw.
Best for:
- Small projects
- Beginners
- Occasional DIY use
A miter box takes more time than a power saw but can produce surprisingly accurate cuts when used carefully.
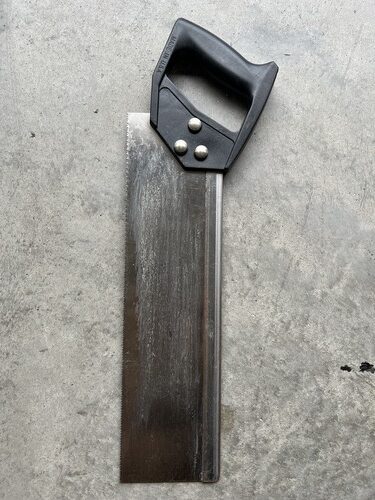
Hand Saw
A basic hand saw can be used to cut baseboards if you’re comfortable cutting freehand.
Best for:
- Straight cuts
- Small repairs
- Budget-friendly projects
While it requires more patience and precision, a hand saw is often enough for simple trim installations.
Coping Saw
A coping saw is commonly used for cutting inside corners on baseboards.
Best for:
- Inside corner joints
- Detailed trim work
- Uneven walls
Many professional trim carpenters actually prefer coping inside corners because it can create tighter-fitting joints than traditional miter cuts.
Circular Saw
If you already own a circular saw, it can be used to cut baseboards without purchasing a miter saw.
Best for:
- Larger DIY projects
- Long trim pieces
- Homeowners who already own a circular saw
Using a speed square or guide can help improve accuracy when cutting trim with a circular saw.
Oscillating Multi-Tool
An oscillating tool isn’t typically the first choice for cutting baseboards, but it can be useful in certain situations.
Best for:
- Trim adjustments
- Small notches
- Cutting installed baseboards
This tool is especially helpful when making modifications after installation.
Tools You’ll Need to Cut Baseboards without a Miter Saw

Before you begin, gather the following tools:
- Hand Saw: A fine-toothed hand saw works well for making clean cuts.
- Miter Cut Box: A miter box helps guide your hand saw for accurate angled cuts.
- Coping Saw: Used for coping the inside corners of the baseboards.
- Measuring Tape: For accurate measurements.
- Pencil: To mark your cuts.
- Sandpaper or File: To smooth out any rough edges.
- Clamps (Optional): To hold the baseboard in place while cutting.
Step-by-Step Instructions to Cut Baseboards without a Miter Saw
1. Measure and Mark the Baseboard
Start by measuring the length of the wall where the baseboard will be installed. Use a tape measure to get an accurate measurement and mark the baseboard with a pencil where the cut will be made.
- Tip: Best Practice is to always measure twice to ensure accuracy. It’s better to cut slightly longer and trim down if needed than to cut too short.
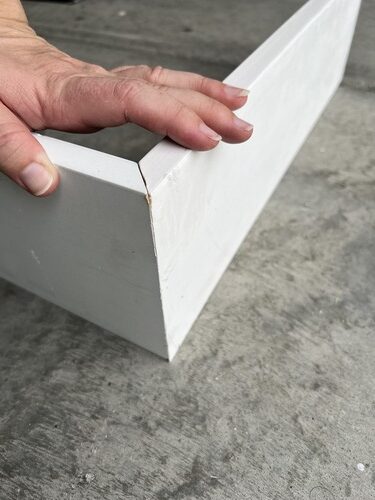
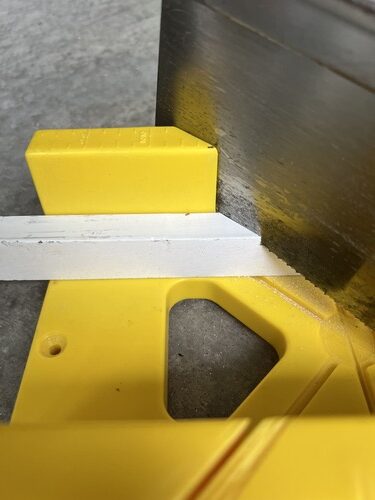
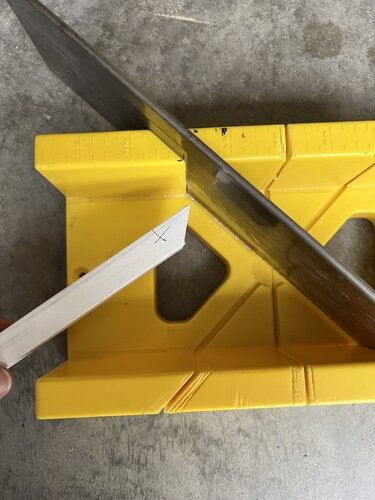
2. Cutting Outside Corners with a Hand Saw and Miter Box
For outside corner cuts (where two walls meet and form an external angle), you’ll need to cut the baseboard at a 45-degree angle.
- Place the baseboard in the miter box: Position the baseboard in the miter box, aligning the marked cut line with the 45-degree slot.
- Cut the baseboard: Use a fine-toothed hand saw to make the cut, following the guide provided by the miter box.
- Tip: If you don’t have a miter box, you can create a 45-degree angle template using a piece of cardboard or wood and use it to guide your hand saw.
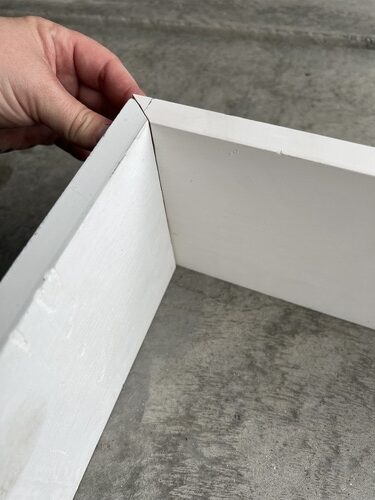
3. Cutting Inside Corners with a Coping Saw
Inside corners cuts (where two walls meet and form an internal angle) are best handled by coping the joint. This method creates a more seamless fit than simply butting the two pieces together.
- Cut a 45-degree angle first: Start by cutting one of the baseboards at a 45-degree angle using the miter box and hand saw, as described above.
- Cope the cut piece edge: Using the coping saw, carefully cut along the profile of the cut edge, following the curve created by the 45-degree cut. This will allow the second piece of baseboard to fit snugly against the inner corner coped joint.
- Tip: Practice coping on a scrap piece of baseboard before attempting it on your actual pieces. This will help you get the hang of the technique.
4. Test Fit and Adjust
Once you’ve made your cuts, it’s important to test fit the pieces before nailing them in place.
- Dry fit the pieces: Place the baseboards against the wall and check the fit at the corners. If the fit isn’t perfect, you can trim small amounts with the coping saw or sandpaper until you’re satisfied with the result.
- Tip: If you notice any gaps, you can fill them with wood filler or caulk before painting or staining the baseboards.
5. Secure the Baseboards
Once the baseboards fit together perfectly, it’s time to secure them to the wall.
- Nail the baseboards in place: Use a power brad nailer to attach the baseboards to the wall. Be sure to use a stud finder to nail into the studs for a secure hold.
- Fill and finish: Fill the nail holes with wood filler and sand them smooth. Once the filler is dry, you can paint or stain the baseboards to match your décor.
Common Mistakes When Cutting Baseboard Corners
Cutting baseboard corners can be challenging for beginners. Avoiding these common mistakes can help improve the fit and appearance of your finished trim.
Measuring From the Wrong Side
One of the most common mistakes is measuring from the wrong end of the baseboard before making a cut.
Before cutting, always double-check:
- Which corner you’re working on
- Which side of the trim will remain visible
- The direction of the angle
Taking a few extra seconds to verify your measurements can prevent wasted material.
Cutting the Wrong Angle
Inside and outside corners require different cuts. It’s easy to accidentally reverse the angle and end up with a piece that doesn’t fit.
Before making your cut:
- Mark the direction of the angle with a pencil
- Dry fit pieces before installation
- Double-check your saw orientation
The old saying “measure twice, cut once” definitely applies here.
Forgetting the Difference Between Inside and Outside Corners
Many DIYers cut every corner the same way, which often leads to frustration during installation.
Remember:
- Inside corners meet inside the room
- Outside corners wrap around an exterior edge
Understanding which type of corner you’re working with before cutting can save time and material.
Leaving Gaps After Installation
Even small measurement errors can create visible gaps where trim pieces meet.
To minimize gaps:
- Make precise measurements
- Test fit pieces before nailing
- Use a coping saw when needed for inside corners
- Fill minor gaps with paintable caulk before painting
Which Baseboard Corners Are Hardest to Cut?
Not all baseboard corners are created equal. Some are much more forgiving than others.
Inside Corners
Inside corners can be difficult because many walls are not perfectly square.
Even a slight variation from 90 degrees can create noticeable gaps. Coping inside corners is often recommended because it allows the trim to fit more tightly against uneven surfaces.
Outside Corners
Outside corners require two precise cuts that must meet cleanly at the edge.
If either cut is off by even a small amount, the corner can appear uneven or leave visible gaps. Careful measuring and test fitting are especially important for outside corners.
Uneven Walls
Uneven walls are often the most challenging part of any baseboard installation.
Even when your cuts are perfect, walls may:
- bow slightly
- be out of square
- have uneven drywall corners
Using caulk and making small adjustments during installation can help create a cleaner finished appearance.
Pro Tip
If you’re new to installing baseboards, practice your cuts on scrap pieces first. A few test cuts can help you understand how inside corners, outside corners, and miter angles work before cutting your final trim pieces.
Time and Cost Comparison
| Method | Cost | Difficulty |
|---|---|---|
| Miter Box | Low | Easy |
| Circular Saw | Medium | Moderate |
| Miter Saw | Higher | Easy |
FAQ about baseboard cutting alternatives???
Yes, you can cut baseboards with a hand saw. While it takes more time and effort than using a miter saw, a hand saw paired with a miter box can produce accurate cuts for both inside and outside corners. This is a great option for DIYers who only need to install baseboards occasionally and don’t want to invest in a power saw.
The easiest way to cut baseboard corners is with a miter saw because it allows you to make precise angle cuts quickly. However, a miter box and hand saw are affordable alternatives that can also produce clean, accurate cuts when used carefully. For beginners, a miter box is often the simplest non-power-tool option.
No, you do not need a miter saw to install baseboards. Many DIYers successfully use a miter box, coping saw, hand saw, or circular saw to make the necessary cuts. A miter saw simply makes the process faster and easier, especially when working with multiple rooms or long sections of trim.
Inside corners can be cut using either a miter cut or a coped joint. A coped joint is often preferred because it creates a tighter fit, especially when walls are not perfectly square. To create a coped joint, one piece of trim is cut at a 45-degree angle and then shaped with a coping saw to match the profile of the adjoining piece.
Outside corners are typically cut by making two opposing 45-degree cuts that meet at the corner. Accurate measurements are important because even small errors can create visible gaps. Before installing the trim, it’s helpful to test fit both pieces to ensure they align properly.
Most baseboard corners are cut at a 45-degree angle, allowing two pieces to meet and form a 90-degree corner. However, because many walls are not perfectly square, you may need to slightly adjust the angle for the best fit.
Cutting baseboard corners without a miter saw may seem challenging at first, but with the right tools, techniques, and a bit of patience, it’s entirely achievable. Whether you’re dealing with an inside or outside corner, taking the time to measure accurately, precise cut carefully, and test fit will ensure a professional-looking finish that enhances the overall appearance of your space.
The sense of accomplishment you’ll feel from successfully installing your baseboards without relying on power tools is well worth the effort.
By mastering these techniques, you can confidently tackle baseboard installations in any room, knowing that you have the skills to achieve tight-fitting corners that look just as good as those made with a miter saw.
Plus, you’ll have gained valuable experience that can be applied to future projects, making you a more versatile and capable DIYer. Remember, the key to success is precision and practice, so take your time, follow the steps carefully, and enjoy the satisfaction of a job well done.
Cutting baseboard corners can be a challenge without a miter saw, but it’s totally doable! For other DIY tips, see our Best Paint Brushes for Baseboards guide, and if you’re setting up a workspace, try our DIY Custom Office Corner Desk tutorial.
If or when you decide to tackle How to Cut Baseboard Corners Without a Miter Saw Tutorial, I’d love for you to tag us on Instagram so I can see your really fun recipes and DIY projects come to life!
COZY HOME, COZY RECIPES:
Every cozy home deserves amazing recipes, and it’s even better when those recipes are both delicious and healthy. Our goal is to provide tasty meals that are easy to make, regardless of your skill level.
Fast, easy meals leave more time for fun activities, making your home a hub of joy and good food.
CONNECT WITH US:
As always, we love hearing about your experiences with our “How to Cut Baseboard Corners Without a Miter Saw Tutorial”. Reach out to us through our social channels. Any questions you have, we’re here to answer.
Stay updated by joining our newsletter, offering a monthly dose of new recipes and a first look at upcoming projects.
MORE COZY KITCHEN RECIPES:
If you’re hungry for more, explore our collection of Cozy Kitchen Recipes. Another healthy favorite is the “Sausage Potato Veggie Bake.” Find these recipes and more here.
DIY RESOURCES:
For additional resources, check out our DIY Tutorials, offering a wealth of information to enhance your home improvement skills.

