


Transform your Kitchen in a weekend!

Time for an easy Kitchen Island upgrade with this how to Transform Your Kitchen Step-by-Step with our DIY Shiplap Kitchen Island Tutorial. We created this beginner friendly tutorial anyone can tackle!
Are you tired of your boring/outdated island? But, don’t want to spend a fortune to update it! Are you also worried about how hard a project might be or how long it will take? Believe it or not, you can do this in one weekend.
The hardest part about this project will be picking your paint color!!! Let’s dive in and get you feeling more confident in starting this dream project.
If you loved these Easy Weekend Transformation that saved you money. You are going to like this DIY IKEA SKYTTA Office Door Conversion Project we did in one weekend. It saved us from spending thousands of dollars on custom black metal and glass doors to convert our dining room into an office!
Tools Needed for your DIY Shiplap Kitchen Island Tutorial
You will need only a couple tools to make this project a reality. Some people think you need a professional workshop and tools to do projects like this. NOT TRUE!
Hopefully you already have these tools on hand! If not, I suggest borrowing from a friend or family member if this is going to be a one time kinda project for you.
If you think you have other projects in mind for the future…it might be best to invest in these tools to get your DIY tool stash going!
Miter Saw
A Miter Saw will be the fist tool you will need to complete this project. You can also use a Miter Box which is much cheaper but you won’t get the cleanest cuts from it. I would just stick with the miter saw to make sure you get that professional finish look with clean cuts.
You will use your Miter saw to cut all the lengths of your shiplap and trim pieces. This tutorial does not have any miter cuts. Those are a bit trickier to tackle. The trim pieces are what finish off the edges and give you that professional look.
Nail Gun
Any nail gun will work for this project. I prefer a battery operated brad nailer for a couple reasons. No cords or wires to deal with, no noisy compressor needed and more affordable.
You can find Battery Operated Brad Nailers on sale all the time. We got ours a while back for $100.
Supplies Needed for your DIY Shiplap Kitchen Island Tutorial
Shiplap
This will vary in widths depending what look you are going for. For this project we went with a traditional Shiplap width of 6”. It honestly is the perfect size for an island project like this.
Trim Pieces
The framing box pieces we use 1×4” primed pine boards and 1×3” primed boards for the x’s. These framing and trim pieces can be different sizes depending on the look you are going for and your island.
This was a substantial size island measuring about 8’ long x 4’ wide. We wanted chunkier pieces to offset the size of the island. If you have a smaller island you may want to consider smaller trim pieces. This is based on your personal preference, no right or wrong size in my opinion.
Brad Nails
We use 1.25” brad nails for this project. We only needed to go through the shiplap which is roughly ½” thick and ¾” drywall.
Make sure you are choosing the proper length nail so you aren’t going through the drywall/cabinets and into pipes. Most islands have sinks or wiring in them…so be very mindful of those in there and where they may be.
Construction Adhesive
We like to use Liquid Nails for the majority of our construction projects at home!
This one is gonna be a pain point for some people. Some will argue and say never use it because it’s a pain to get off if you change your mind one day.
I say commit to what you are doing for a long time and love it. Also, make sure it is going to be secure for many years to come. If you want to change it down the road, worry about that then.
Wood Filler & Sanding Pad
Wood filler will make sure you cover all those nail holes and finish with a professional look. You will also need to wood fill all the flat seams between your trim pieces.
Get the foam sanding pads 220/300 grit or higher. These are inexpensive and leave a great finished look for painting.
Caulking
Caulking is every DIYers best friend. It can make or break getting that professional finished look. You will use caulk in any corner edges that are not flat to fill gaps to look seamless.
Primer & Paint
Your pine boards should already be primed. Which means you can skip the priming part. That is why I choose to use those boards for 99% of our home DIY projects. You’ll spend more on them but save time not sanding and priming. You also save on not having to buy a separate tub of primer.
DO NOT SKIMP ON THIS PART!
Most people want to buy the cheapest paint. DO NOT DO THAT for this project. Kitchen Islands take a beating and may need to be wiped down from time to time. Spend a little extra and get a better quality paint that won’t chip on you and scuff easily.
Daily Step-by Step Instructions for your DIY Shiplap Kitchen Island Tutorial
These are the steps that will make this projects move fast and seamless for you in one weekend.
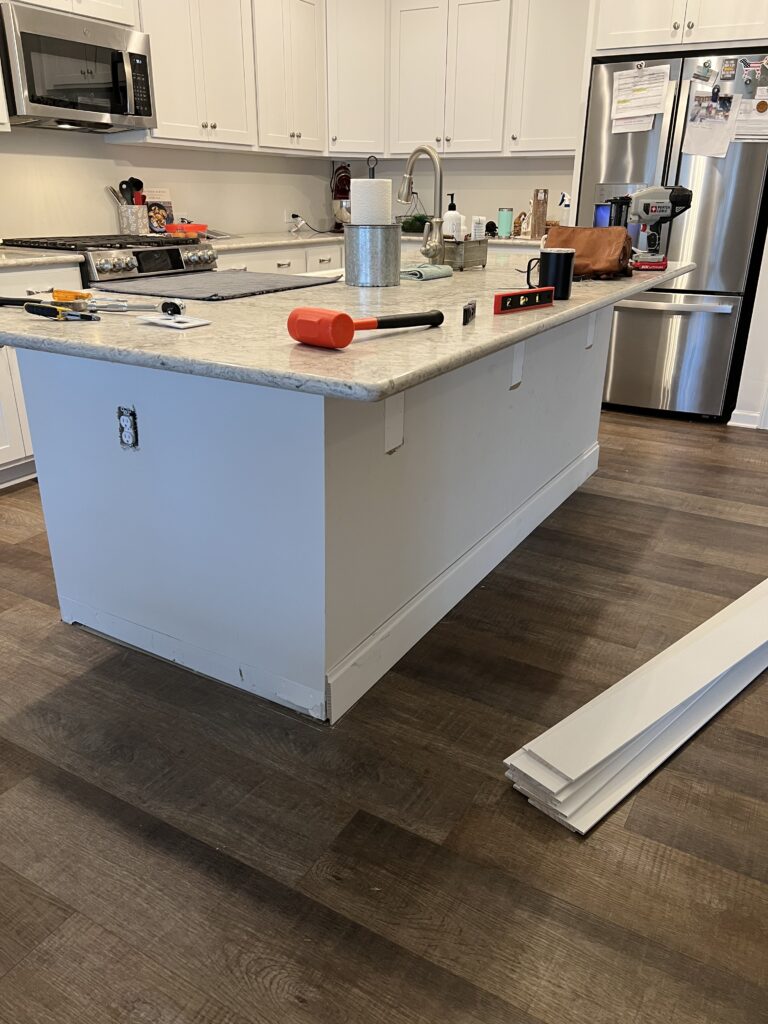
Day 1 – Friday Night
I like to consider Friday nights the demo and prep day for weekend projects. You can use Friday night to demo any trim or things that need to be moved before starting. It is also a great time to go grab your supplies from the home improvement store.
This makes sure that Saturday morning you are ready to hit the ground running with no interruptions. Because let’s be real…there is nothing more frustrating than not finishing that project and having to wait until the following weekend to finish it.

Day 2 – Saturday
Start early and give yourself enough time to cut all of your pieces and install them all. Then wood fill and caulk so those can dry overnight.
- Cut all Shiplap Boards to the length you need them.
- Attach all of your shiplap boards starting from the bottom
- Nail into the groove of each board in the groove where the next board will sit on top (this hides those nail holes so you don’t have to fill those)
- Keeping attaching your boards until you get all the way to the top
- Cut your trim pieces to create boxes on each side of the island with shiplap
- Nail all box trim pieces in place overlapping on the corners
- Cut your x trim pieces for your end caps
- Nail your x pieces into place
- Wood fill all nail holes on trim pieces and flat trim seems
- Caulk all corner edges that are visible to fill gaps
- Let dry overnight
Day 3 – Sunday
First you will want to focus on sanding all of your wood filled areas. Make sure to wipe all fine dust off before painting. Start painting and enjoy your new island before the weekend is over!
- Sand your wood fill areas flush once dry
- Wipe all fine dust off before painting with a tack cloth
- Paint 2-3 coats of your paint choice

Congrats! You just learned everything you need to know on how to tackle this project and finish it with confidence!

With our easy-to-follow tutorial, transforming your kitchen island has never been simpler. Embrace the opportunity to revamp your space and enjoy the satisfaction of a job well done.
Get ready to impress friends and family with your newfound DIY skills and the stunning results of your shiplap kitchen island makeover.
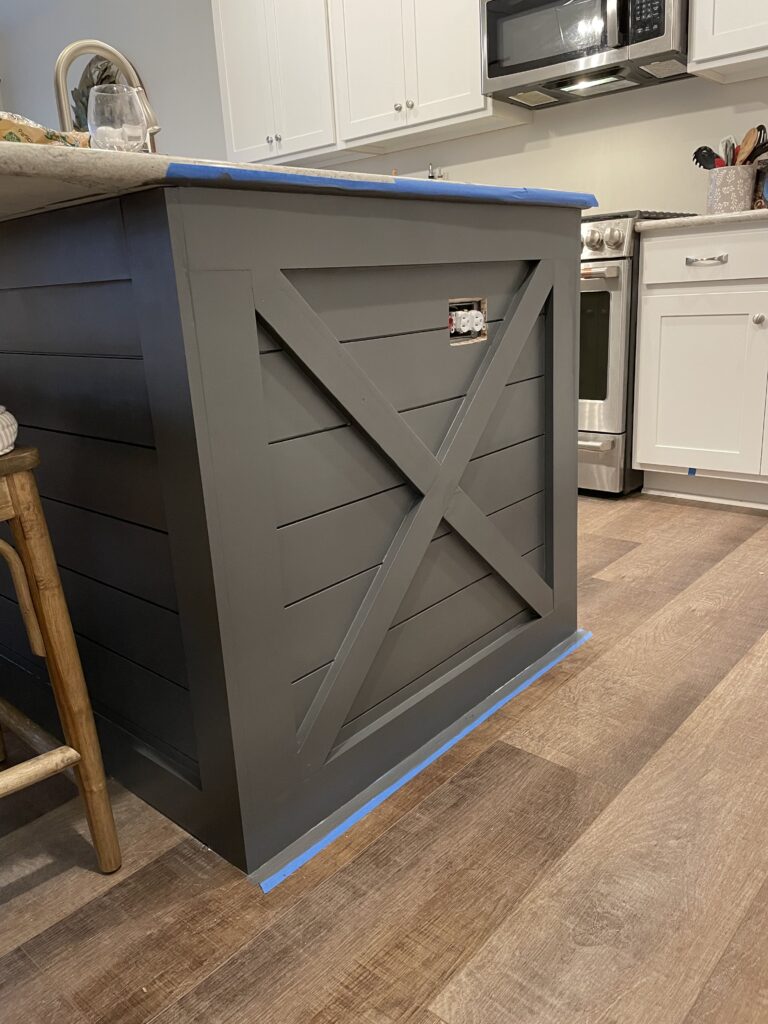
As you can see in this before and after. This shiplap kitchen island refresh made a huge difference in this space. Not only did the shiplap look bring out the island as a centerpiece, the dark accent color added so much dimension.
The color is Sherwin Williams Peppercorn!
I love the dimension a dark color can bring to any design. Be bold in your choice when it comes to color selection! Take chances, it’s just paint!
PRO TIP: If you don’t feel you can do this in one weekend. Take your time and work at your pace. You want quality work over how fast you can finish it!!! The more time you take to do it right the better the end result will be!
DIY RESOURCES:
If you loved our DIY Shiplap Kitchen Island Tutorial. Here are additional resources, check out our DIY Tutorials, offering a wealth of information to enhance your home improvement skills.
CONNECT WITH US:
As always, we love hearing about your experiences with our “Easy DIY Shiplap Kitchen Island Tutorial: Transform Your Space in a Weekend”. Reach out to us through our social channels. Any questions you have, we’re here to answer.
Newsletter Sign-Up:
Stay updated by joining our COZY MOMENTS Newsletter, offering a monthly dose of recipes, a first look at upcoming projects/reveals and other fun things we have for our newsletter members only!
COZY HOME KITCHEN RECIPES:
Every cozy home deserves amazing recipes, and it’s even better when those recipes are both delicious and healthy. Our goal is to provide tasty meals that are easy to make, regardless of your skill level.
Fast, easy meals leave more time for fun activities, making your home a hub of joy and good food.
If you’re hungry for more, explore our collection of Cozy Home Kitchen Recipes. A healthy favorite is the “Sausage Potato Veggie Bake.” Find these recipes and more here.


Turned out great
Thank you! I am glad you like it!
Way to upgrade the island to a more custom look.
Thank you, I am glad you think it has more of a custom look now!
Looks incredible! Love the blue!
It is a gorgeous blue! Glad you love it!