


Skytta IKEA Black Metal and Glass Sliding Office Doors Hack

Have you ever seen those gorgeous Black and Glass Metal Doors in homes? They are stunning but their price point can be what deters people from having them. At least that is what happened to us.
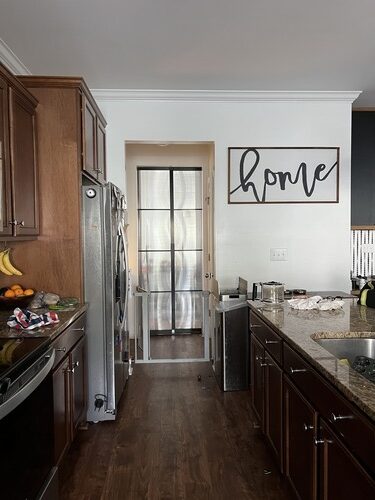
I wanted Black Metal Sliding Doors for our Large Office Opening that used to be our dining room. We got a quote from a company for just over $5,000 for a DIY Kit to do it ourselves. This didn’t even include install if we wanted them to do that part. 🤯
I was shocked at the price! I knew they would be expensive but oh my goodness was that WAY MOREEEE than I expected and also wayyyyy out of my budget for the office makeover.
We wanted a dream office we would be inspired in for many years to come. The design and layout of your office can significantly impact your productivity and comfort. So, if you’re looking for a stylish, affordable, industrial looking glass door and space-saving solution for office doors, The Skytta IKEA door system/room divider could be just the answer.
Originally designed for closets, these sleek sliding doors are versatile enough to be repurposed for separating rooms, creating an attractive and functional partition. Whether you have a home office or want to partition a larger room, IKEA Skytta closet doors can be a cost-effective alternative to traditional doors.
They offer a modern aesthetic and save space by eliminating the need for a swinging door, making them perfect for compact spaces. In this guide, we’ll walk you through how to install IKEA Skytta closet doors as office doors, helping you enhance your workspace or home both in terms of function and style.
Let’s get into it already!!!
Cost Breakdown (IKEA SKYTTA Office Door Hack)
One of the biggest benefits of using IKEA SKYTTA doors for an office doorway conversion is that it can be significantly more affordable than custom-built sliding doors or full wall renovations.
Here’s a realistic breakdown of what this DIY project may cost:
- IKEA SKYTTA sliding door system: $400–$900+ depending on size and configuration
- Door panels/inserts (if not included): $100–$300
- Hardware/track components: usually included, but extra brackets or reinforcement may cost $20–$75
- Trim, paint, or finishing materials: $30–$150
- Optional upgrades (handles, soft-close, etc.): $20–$100
Estimated total:
Most DIYers spend around $500–$1,200 total
This makes it a budget-friendly alternative compared to custom office doors or full remodels, which can easily cost several thousand dollars.
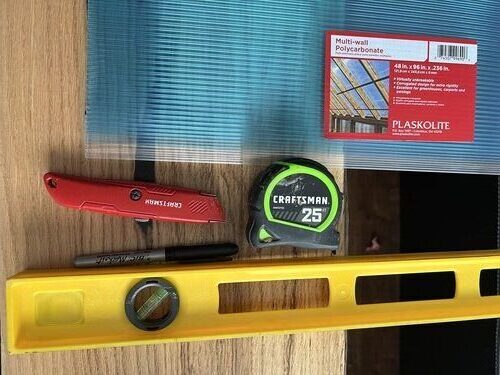
Tools Used List to Install Skytta IKEA Door System
This project doesn’t require advanced construction tools, but having the right basics will make installation much smoother.
Before you begin, make sure you have the following tools and materials ready:
- Drill and drill bits
- Screwdriver (manual or electric)
- Measuring tape
- Level
- Pencil
- Wall anchors (if necessary)
- Mounting brackets (comes with the IKEA Skytta system)
- Stud finder
- Screws (provided in the kit)
- Hacksaw
- Utility Knife
- Safety Glasses
Helpful but optional:
- Laser level (for perfect alignment)
- Clamps (for holding pieces in place during install)
- Caulk gun (for finishing gaps)
Step-by-Step Instructions to Install your Skytta IKEA Door System

1. Measure the Doorway
Before purchasing and installing the IKEA Skytta closet doors, it’s crucial to accurately measure the opening where you plan to install them. These sliding doors work best when the space’s width and total height of the doorway align with the dimensions of the doors.
- Tip: If your doorway doesn’t match the standard Skytta dimensions, you might need to adjust the frame slightly or use Skytta ceiling height reducer to close any gaps.
2. Prepare the Space
Ensure that the area where the doors will be installed is clean and clear. If you’re installing the Skytta doors in place of an existing door, remove the old door and any related hardware.
- Tip: Fill in any holes or imperfections left by the previous door’s hinges or screws, and repaint the area if necessary for a clean finish.
3. Order the doors and extra supplies needed
These doors come in kits for common size openings. If you have a common size opening ordering the kits will be the best route to go to make sure you aren’t missing any pieces when you go to install. Make sure to look at the two different colors to choose between, black and white.
Install Ready Complete Skytta Kits: White System | Black System
- Tip: Once your supplies are with you. Double checked before you start that you have all the supplies you need before you start your doors
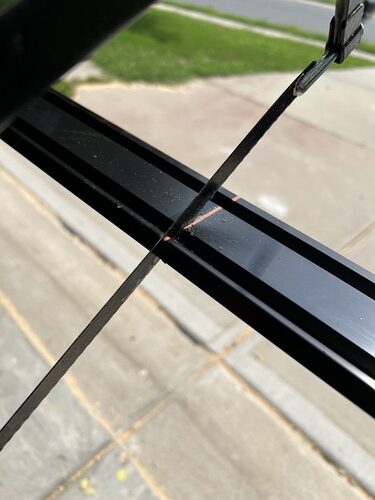
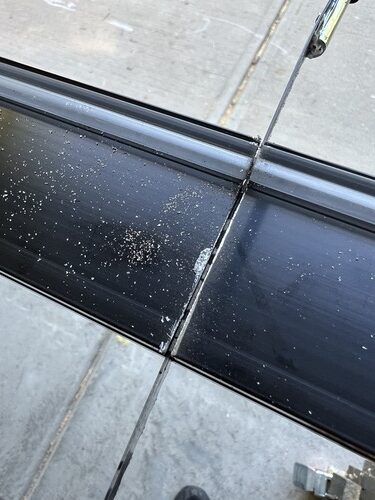
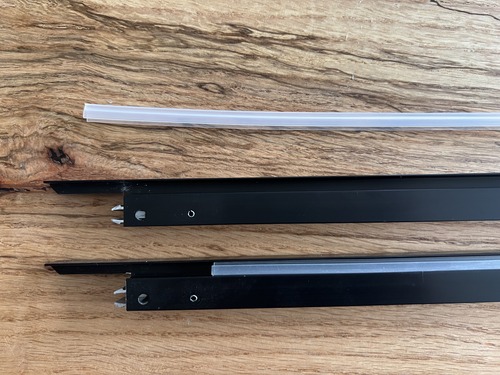
4. Cut your tracks
This is where you will cut your track pieces to the proper length you need them to be. If you need to join two tracks they provide small metal pieces that help you easily do this. Follow instructions that came with the tracks at this point.
- Tip: You can easily cut your metal tracks using a carbide hack saw.
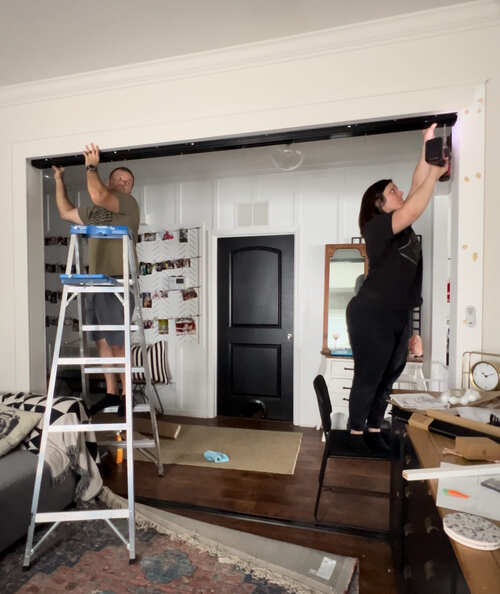
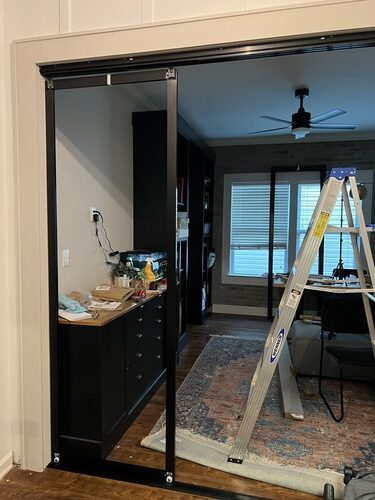
5. Install the Upper Skytta IKEA Track
The IKEA Skytta system uses an upper sliding track to allow the doors to glide smoothly. Begin by attaching the upper track to the top of the doorway or wall using the provided screws.
- Tip: Use a stud finder to locate studs in the wall for secure mounting. If there are no studs available, use wall anchors for added support.
- Tip: Ensure the track is level by using a spirit level before securing it in place. An uneven track will prevent the doors from sliding properly.
6. Attach the Floor Skytta IKEA Guide/Track
Next, you’ll need to install the floor guide at the bottom of the doorway. This guide keeps the doors in place and prevents them from swinging as they slide.
- Tip: Use the provided screws to attach the guide directly to the floor. Make sure it is aligned with the upper track so the doors will slide straight.
7. Cut door frames to size
The best thing about these doors is they can be customized to fir any size opening. You will disassemble the door pieces completely. Use a carbide hand saw like you used on the tracks to cut the door pieces to the size you need them to be.
- Tip: Measure your opening width and height after the tracks are installed. This will give your new door sizes that you will use to cut down your doors to the size you need.
8. Mount the Doors
With the tracks installed, it’s time to assemble and hang the Skytta doors. Lift the first door and hook it onto the top track, ensuring that it slides smoothly. Then, lower the door into the floor guide to lock it in place.
- Tip: If you’re working alone, consider using clamps to hold the track steady while you attach the doors, or have someone assist you in lifting and positioning the doors.
9. Adjust the Doors
Once the doors are in place, you may need to make adjustments to ensure they operate smoothly and align properly. Most sliding door systems allow for minor height adjustments by turning screws located at the top of the door.
- Tip: Check both the alignment and the sliding motion of the doors. If they feel too tight or too loose, adjust the screws until the doors move effortlessly.
10. Test the Functionality
After installing and adjusting the doors, it’s time to test them thoroughly. Slide each door back and forth several times to ensure they open and close smoothly without sticking or wobbling.
- Tip: If the doors don’t slide smoothly, double-check that the track is level and there are no obstructions in the floor guide.

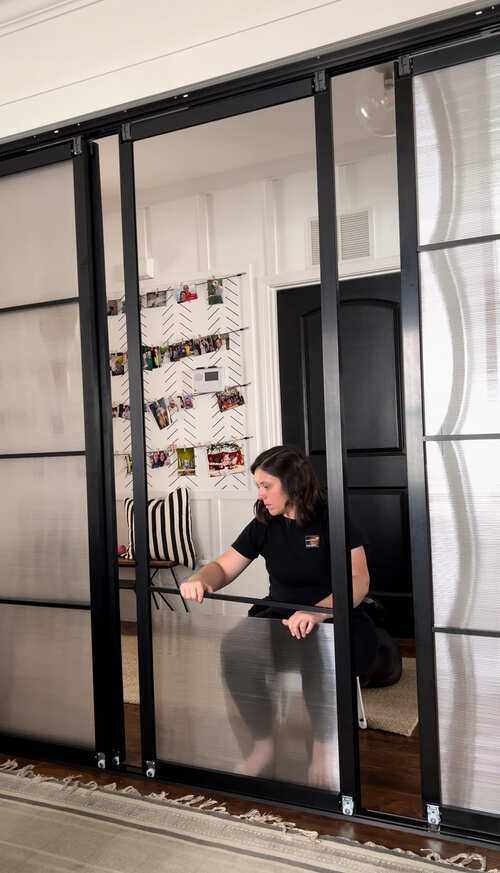
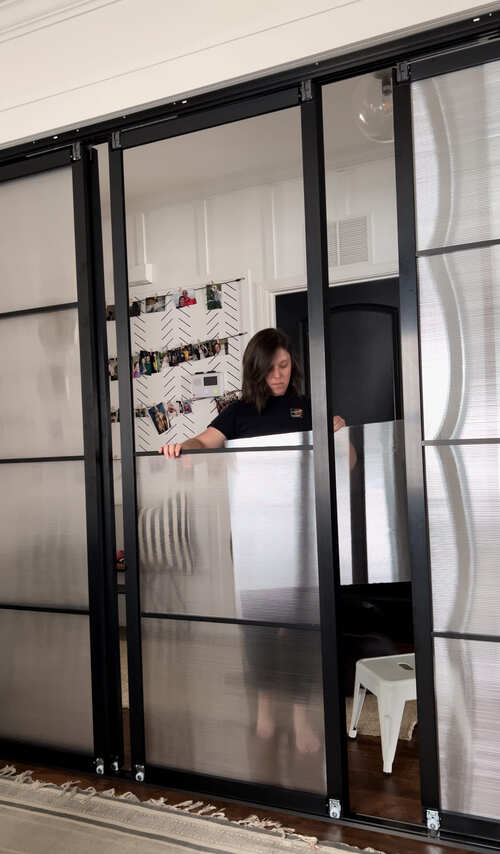
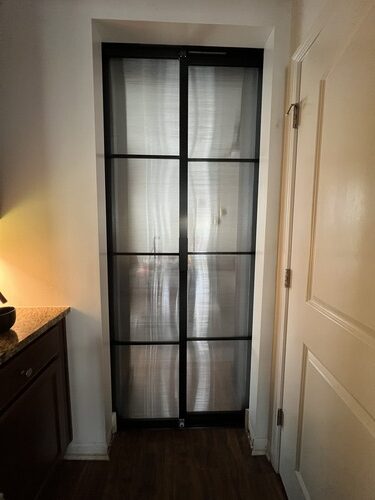
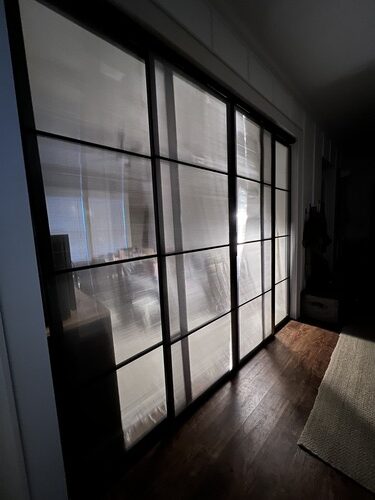
11. Insert Door Panels
There are hinged edges around all four side of each door panel. These snap open once installed in place to allow you to insert your panels.
Option 1: Use panels IKEA provides to fit these doors if you did not alter the size of the doors. If you did alter the door size some of their panels you can cut down yourself and some you can’t. Make sure to read your manual and know which ones can or can’t be altered.
Option 2: Whether you alter your door sizes or not. You can choose to make the style of the doors your very own by choosing from a wide range of panels. They come in various materials that can fit any design style.
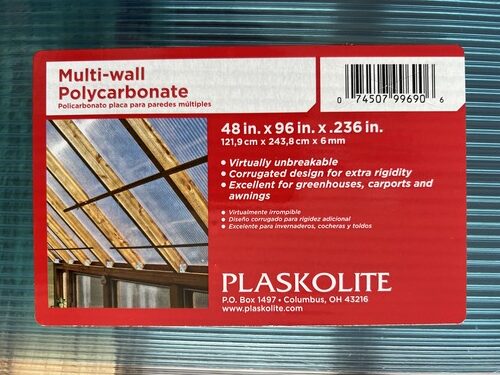
Tip for Choosing your own Panel Product: We chose to use Polycarbonate corrugated transparent panels. This gave us the reeded look glasses we were going for. It was cheaper than IKEA’s glass panels for these doors. The Polycarbonate Panels cut very easily by just scoring the plastic with a utility knife and applying light pressure until the line snapped. We flipped the polycarbonate over and easily cut the other side also with the utility knife.https://creatoriq.cc/3Y21FID
Why did we really choose polycarbonate? The biggest reason was because of our daughter and any little ones that come into our home. Seeing that this is a high traffic area and kids break things. Mentally it made me feel better knowing there wasn’t glass in these doors that could shatter and hurt a little one. Thank goodness this stuff also has a gorgeous reeded look and costs less. It was just a no brainer win all around.
One thing to keep in mind when choosing your own product to make panels out of. The doors are designed to use ⅛” thick panels. The thinnest we could find the Polycarbonate panels was ¼” and we were able to make it work just fine. You just have to remove the rubber pieces in your crossbar pieces and then they slide right into place when installing.
12. Secure and Finish
Once you’re satisfied with the installation, secure all screws and fasteners. Clean up any dust or debris left from the installation process, and consider adding decorative trim or finishing touches to enhance the look of your new office doors.
- Tip: Add a handle or knob to each door for easier access and a polished look. IKEA offers compatible handles that pair well with the Skytta system.

Mistakes to Avoid when Installing SKYTTA IKEA Door System
- Skipping the Measurements: Failing to measure the doorway correctly can result in doors that don’t fit properly, leading to frustration and extra work. Always double-check your measurements before starting.
- Not Checking for Level: Installing the track without ensuring it’s perfectly level can cause the doors to slide unevenly or get stuck. Always use a level to guarantee smooth operation.
- Overlooking Wall Anchors: If there are no studs where you’re installing the track, use proper wall anchors to secure the track. This will prevent the track from pulling away from the wall over time.
- IKEA Assembly Instructions: Make sure you are also referring back to IKEA’s Assembly Instructions throughout the install.
Time It Took
The total installation time for this project depends on experience level and whether wall prep is needed.
Typical timeline:
- Planning and measuring: 1–2 hours
- Installation: 3–6 hours
- Adjustments and finishing: 1–2 hours
Total estimated time:
Half a day to a full weekend
First-time installers may take longer, especially when ensuring everything is level and properly aligned.
Why SKYTTA Worked vs Other IKEA Systems
Not all IKEA systems are suitable for converting a space into sliding office doors. SKYTTA stands out because it is specifically designed for floor-to-ceiling sliding door systems.
Why SKYTTA works best:
- Designed for large, full-height panels
- Cleaner, more modern built-in appearance
- Smoother sliding mechanism compared to closet systems
- Better structural stability for heavier door panels
- More customizable for room dividers or office conversions
Why other IKEA systems fall short:
- PAX doors are primarily closet-focused
- AURDAL and PLATSA systems are not designed for full doorway coverage
- Smaller systems often lack the structural strength or track stability needed for daily use
SKYTTA is one of the few IKEA systems that actually feels like a true architectural upgrade rather than a repurposed storage solution.
Incorporating IKEA Skytta closet doors into your office space as sliding doors is an affordable and stylish solution, especially if you’re looking for alternatives to more expensive black and glass metal doors.
Initially, you might be tempted to invest in custom options, but as we discovered, the cost of high-end sliding doors can be overwhelming. With a bit of creativity, repurposing IKEA Skytta doors allows you to achieve a modern, sleek look without the hefty price tag.
Not only do these doors offer a functional solution by saving space and eliminating the need for swinging doors, but they also bring a minimalist, polished aesthetic to your office environment.
The versatility of the Skytta doors system allows for customization, whether you’re working with a standard-size opening or need to modify the doors to fit a unique space. By carefully following the installation process and using the right tools, you can create a professional, finished look that enhances both the design and functionality of your workspace.
Repurposing closet doors for your office is a smart, budget-friendly IKEA hack that can elevate the feel of your home office. IKEA Skytta doors provide a cost-effective option for creating partitions or simply upgrading your office entry, making them a great choice for anyone looking to achieve a high-end beautiful look design without breaking the bank.
With this guide, you’ll be well-equipped to install these doors and enjoy the benefits of a stylish and functional office for years to come. I can’t wait to see how you utilize this IKEA Hack in your own space.
FAQ SKYTTA IKEA Office Doors???
Yes, SKYTTA systems can be adapted for office door conversions and room dividers, especially in open-concept spaces or renovations.
It’s moderately easy for DIYers with basic tools, but precision is important. The hardest part is ensuring the track is perfectly level.
Most installations range between $500 and $1,200 depending on size, materials, and additional finishing upgrades.
They reduce sound slightly but are not fully soundproof. Adding weather stripping or seals can improve noise reduction.
Yes, but you must ensure the track is properly anchored into studs or reinforced with wall anchors designed for heavy loads.
SKYTTA is more affordable and easier to install, while custom doors offer more design flexibility. SKYTTA is a great middle-ground DIY solution. We were quoted $5000k to put custom glass and black sliding doors for this space. This cost us less than 25% of that cost which is a huge savings.
If or when you decide to Use IKEA Skytta Closet Doors for your space, I’d love for you to tag us on Instagram so I can see your finished DIY projects come to life!
COZY HOME, COZY RECIPES:
Every cozy home deserves amazing recipes, and it’s even better when those recipes are both delicious and healthy. Our goal is to provide tasty meals that are easy to make, regardless of your skill level.
Fast, easy meals leave more time for fun activities, making your home a hub of joy and good food.
CONNECT WITH US:
As always, we love hearing about your experiences with our “A Step-by-Step Guide For Using Skytta IKEA Closet Doors as Office Doors”. Reach out to us through our social channels. Any questions you have, we’re here to answer.
Stay updated by joining our newsletter, offering a monthly dose of new recipes and a first look at upcoming projects.
MORE COZY KITCHEN RECIPES:
If you’re hungry for more, explore our collection of Cozy Kitchen Recipes. Another healthy favorite is the “Sausage Potato Veggie Bake.” Find these recipes and more here.
DIY RESOURCES:
For additional resources, check out our DIY Tutorials, offering a wealth of information to enhance your home improvement skills.

